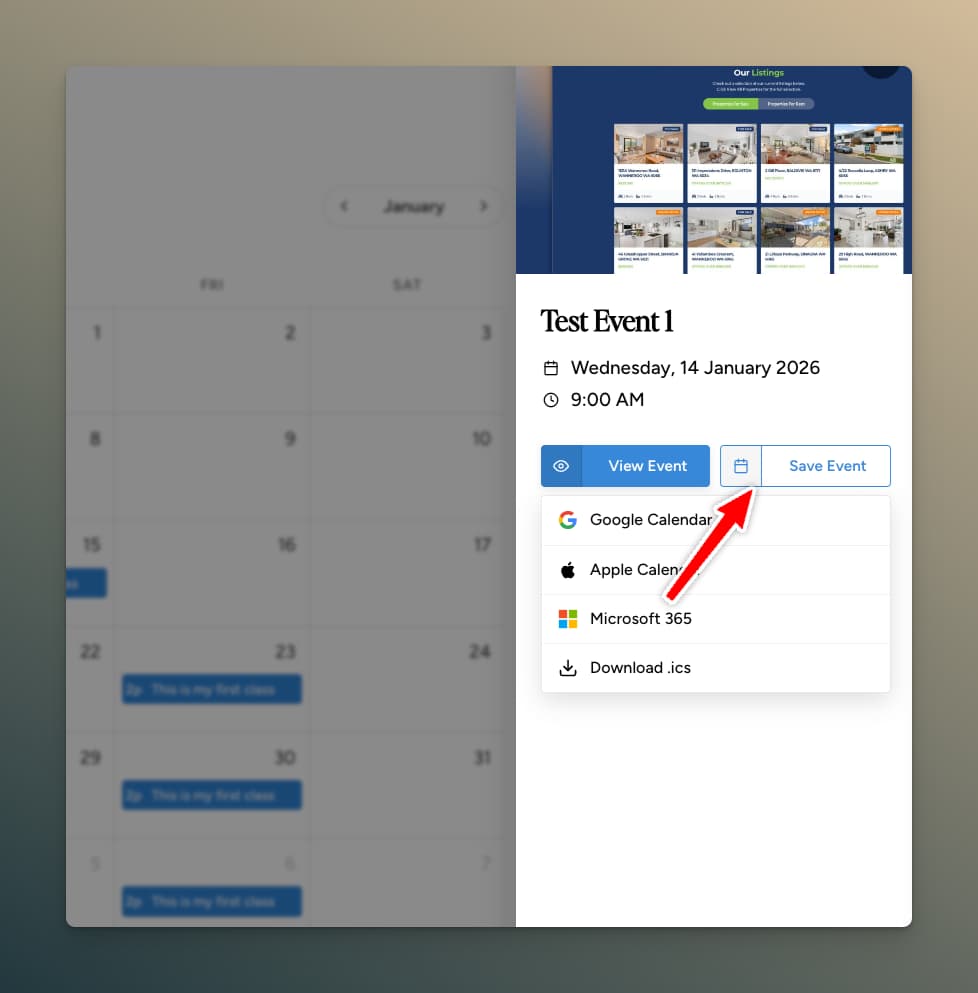
Add to Calendar
Let visitors save events to their personal calendars.
Overview
The Add to Calendar feature provides a button that lets users save events to:
- Google Calendar
- Apple Calendar (iCal download)
- Microsoft 365
- Outlook.com
- Yahoo Calendar
Enabling the Feature
- Go to Recurring Events → Settings → Calendar tab
- In the Calendar tab, find Save to Calendar button
- Toggle it On
- Configure the required fields
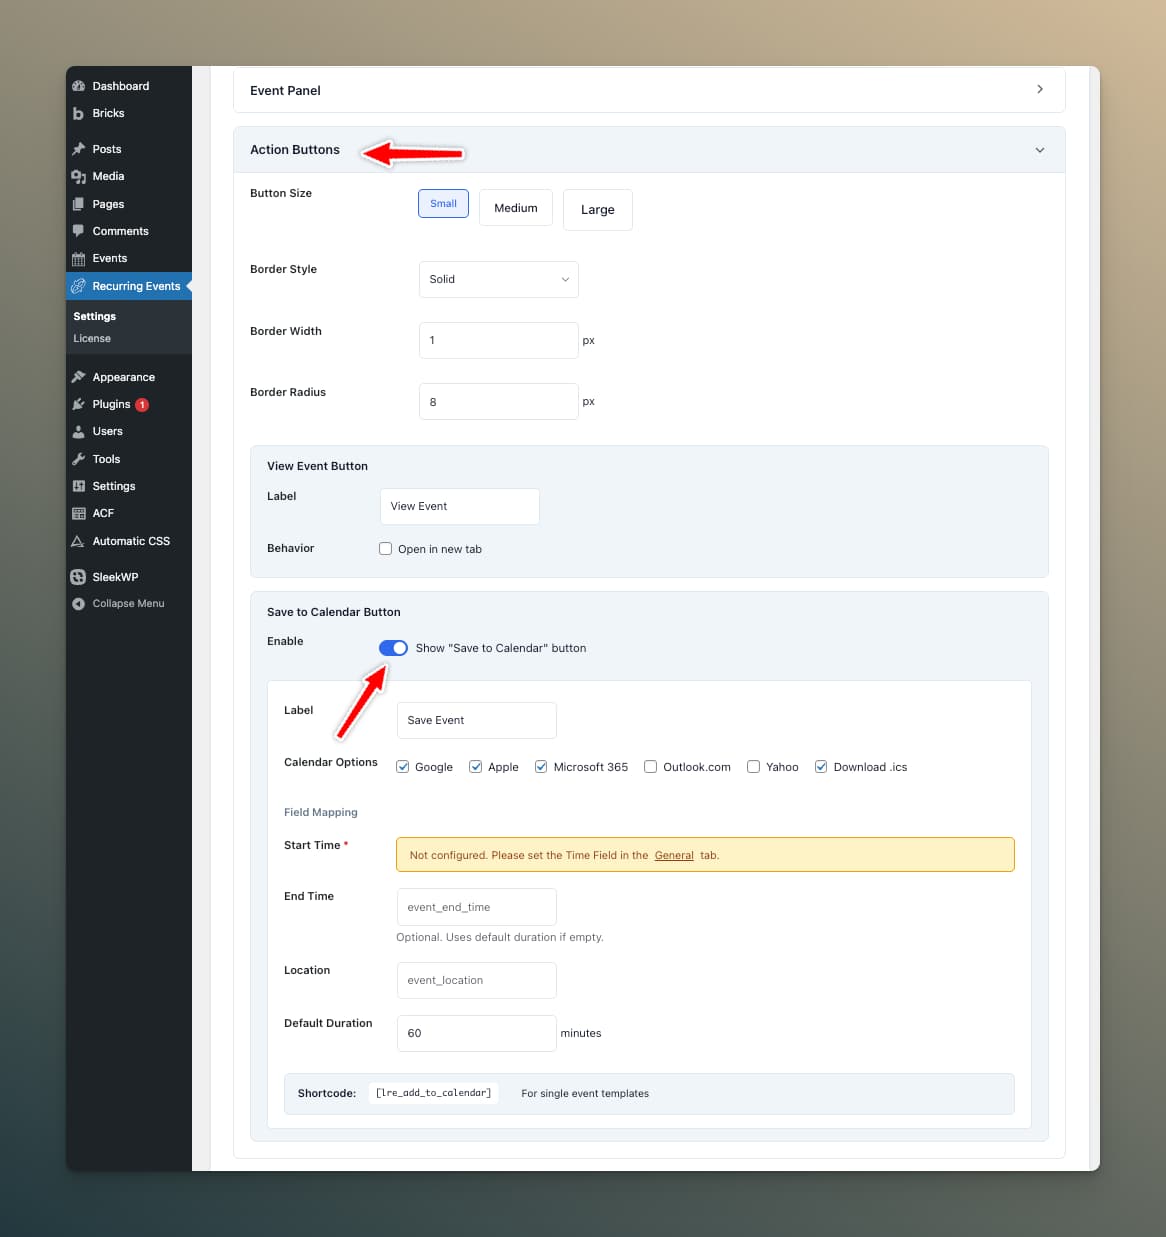
Required Configuration
| Setting | Description |
|---|---|
| Start Time Field | Field name storing event start time |
| End Time Field | Field name storing end time (optional) |
| Location Field | Field name storing venue/location (optional) |
| Default Duration | Fallback duration if no end time (e.g., "1 hour") |
Calendar Providers
Enable/disable specific calendar providers:
- Google Calendar ✓
- Apple Calendar ✓
- Microsoft 365 ✓
- Outlook.com ✓
- Yahoo Calendar ✓
Where the Button Appears
Calendar Offcanvas
When event display is set to "offcanvas", the Add to Calendar button automatically appears in the event details panel.
Shortcode
Use the shortcode on single event templates:
[lre_add_to_calendar]
Shortcode Attributes
| Attribute | Description | Default |
|---|---|---|
post_id | Specific event ID | Current post |
date | Specific occurrence date | URL param or next |
label | Button text | Settings default |
calendars | Enabled providers | Settings default |
class | CSS class | — |
Examples
// Basic usage
[lre_add_to_calendar]

// Custom label
[lre_add_to_calendar label="Save to My Calendar"]

// Specific calendars only
[lre_add_to_calendar calendars="Google,Apple"]

// Specific event and date
[lre_add_to_calendar post_id="123" date="2026-03-15"]
How It Works
When a user clicks the Add to Calendar button:
- A dropdown appears with calendar options
- User selects their preferred calendar
- For web calendars (Google, Yahoo, etc.), a new tab opens with pre-filled event details
- For Apple Calendar, an ICS file downloads
Single Occurrence vs Entire Series
The dropdown offers two download modes for recurring events:
- Single occurrence — Adds just the selected date to the user's calendar
- Entire Series — Downloads a single ICS file containing the full recurring series using the iCalendar
RRULEstandard. The user's calendar app (Apple Calendar, Outlook, Google Calendar via import) interprets the rule and creates all occurrences natively.
The "Entire Series" option is available for events using standard recurrence patterns (Daily, Weekly, Monthly, Yearly). It respects the event's end type — events ending "After X occurrences" or "On date" include those limits in the RRULE.
"Entire Series" works with all end types. If you previously saw it greyed out for events using "After X occurrences", this was fixed in version 1.5.0.
Event Data
The button sends this information to the calendar:
- Title: Event post title
- Date: The specific occurrence date
- Time: Start time (and end time if configured)
- Location: Venue if location field is set
- Description: Event excerpt
- URL: Link back to your event page
Styling
Default Styles
The button uses clean, accessible default styling that works with most themes.
Custom CSS
Target the button with these selectors:
/* Button container */
.lre-add-to-calendar-container { }

/* Main button */
.lre-add-to-calendar-btn { }

/* Dropdown menu */
.lre-add-to-calendar-dropdown { }

/* Individual calendar options */
.lre-add-to-calendar-option { }
Example Customization
.lre-add-to-calendar-btn {
    background: #007bff;
    color: white;
    border-radius: 4px;
    padding: 10px 20px;
}

.lre-add-to-calendar-dropdown {
    box-shadow: 0 4px 12px rgba(0,0,0,0.15);
}
Time Zone Handling
Events are created in the user's calendar with your WordPress site's timezone. The calendar application handles conversion to the user's local time.
Troubleshooting
Button Not Appearing
- Verify Add to Calendar is enabled in settings
- Check that Start Time Field is configured correctly
- Ensure the event has a time value in that field
Wrong Times in Calendar
- Check your WordPress timezone (Settings → General)
- Verify the time format in your time field
- Ensure consistent date/time formats
ICS Download Not Working
- Check for JavaScript errors in browser console
- Verify no caching plugin is blocking the download
- Test in incognito mode
Technical Details
- No external dependencies—pure JavaScript implementation
- ICS files generated client-side
- Web calendar links open in new tabs
- Works with both recurring and one-time events
- Respects occurrence-specific overrides